Introduction
In today’s fast-paced world, where health consciousness is on the rise, the importance of healthy snacking, particularly for school-aged children, cannot be overstated. As parents and caregivers, we strive to provide our children with nutritious options that not only fuel their bodies but also delight their taste buds. Healthy snacks can play a pivotal role in a child’s daily routine, offering essential nutrients that support their growth, concentration, and energy levels throughout the school day.
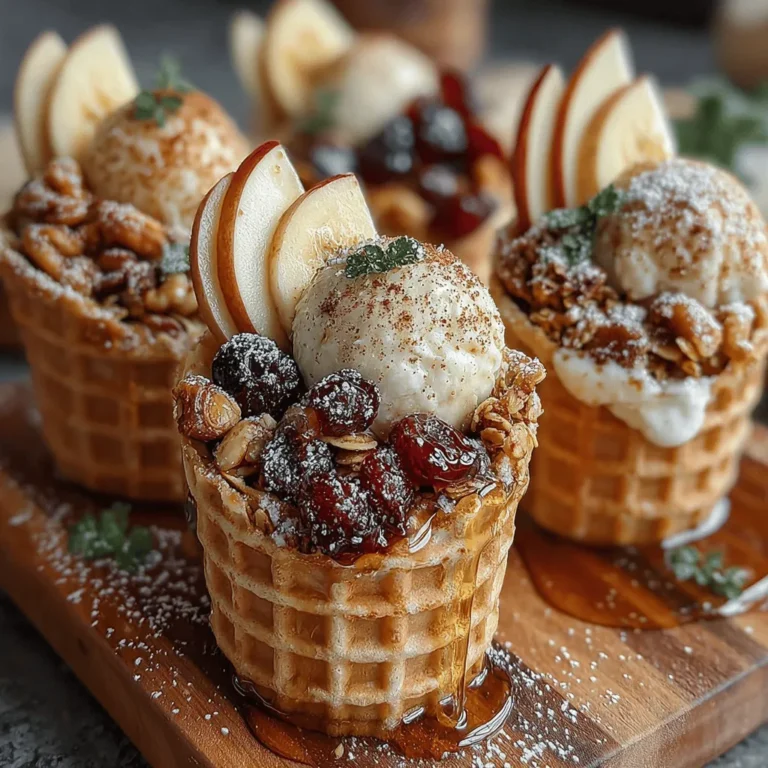
One such delightful option that embodies the essence of fun and nutrition is the Crunchy School Snack Cones. This innovative snack combines vibrant colors and exciting textures, making it an appealing choice for kids. The versatility of the snack cones allows for a myriad of combinations, catering to various tastes while ensuring that each serving is packed with essential vitamins and minerals. Not only do these cones serve as an engaging way to enjoy healthy foods, but they also allow children to explore a variety of flavors, fostering a love for nutritious eating from an early age.
Understanding the Importance of Healthy Snacks
Healthy snacking is more than just a trend; it is a vital component of a balanced diet, especially for children. During the school day, kids require frequent fuel to keep their energy levels stable and their minds sharp. Nutritious snacks help combat the midday slump, improving concentration and enhancing overall well-being. When children consume snacks rich in essential nutrients, they are better equipped to participate in class, engage in physical activities, and maintain a positive mood.
Moreover, healthy snacks can aid in establishing lifelong eating habits. Introducing children to a variety of wholesome foods encourages them to make better choices as they grow. By incorporating options like fresh fruits, vegetables, nuts, and whole grains into their diet, we empower them to develop a palate that appreciates nutrient-dense foods. The Crunchy School Snack Cones are an excellent example of how healthy snacking can be both fun and beneficial, promoting a balanced lifestyle that children will carry into adulthood.
The Benefits of Crunchy School Snack Cones
The Crunchy School Snack Cones are not only visually appealing but also packed with nutritional goodness. Let’s take a closer look at the key components of this recipe and their associated health benefits:
– Nuts: Nuts are a powerhouse of nutrients, providing a rich source of protein, healthy fats, and dietary fiber. They are known to support heart health, brain function, and overall growth. Incorporating a variety of nuts such as almonds, walnuts, and cashews can enhance the nutritional profile of the snack, offering both flavor and crunch.
– Dried Fruits: Dried fruits like raisins, apricots, and cranberries add natural sweetness and a burst of flavor to the snack cones. They are packed with vitamins and minerals, including potassium, magnesium, and antioxidants. Additionally, dried fruits are an excellent source of energy, making them a perfect complement to a busy school day.
– Granola: Granola provides a satisfying crunch and is often made from oats, nuts, and seeds, making it an excellent source of whole grains. It can contribute to sustained energy levels and digestive health. When selecting granola, it’s beneficial to choose options that are low in added sugars to maximize health benefits while enjoying the delightful texture.
– Cinnamon and Sweeteners: Adding a dash of cinnamon or a drizzle of natural sweeteners like honey or maple syrup not only enhances the flavor of the Crunchy School Snack Cones but also offers health benefits. Cinnamon is known for its anti-inflammatory properties and can help regulate blood sugar levels, while natural sweeteners provide a healthier alternative to refined sugar.
Ingredients Breakdown
Creating the Crunchy School Snack Cones requires a thoughtful selection of ingredients, each contributing to the overall nutritional value and taste. Here’s a detailed breakdown of the key ingredients:
– Waffle Cones: The foundation of the snack is the waffle cone. When selecting waffle cones, consider options that are gluten-free or made from whole grains to cater to various dietary preferences. Whole grain cones provide additional fiber, while gluten-free options ensure that everyone can enjoy this tasty treat.
– Mixed Nuts: A blend of different nuts can enhance the flavor and health benefits of the Crunchy School Snack Cones. Almonds, walnuts, and pecans are excellent choices, each bringing unique nutrients to the mix. Almonds are rich in vitamin E, walnuts provide omega-3 fatty acids, and pecans are a good source of antioxidants.
– Dried Fruits: The choice of dried fruits can be as varied as your imagination. Options like apricots, figs, and dates not only add sweetness but also a chewy texture that contrasts nicely with the crunch of the nuts. When choosing dried fruits, look for those with no added sugars or preservatives to keep the snack wholesome.
– Granola: Granola can be store-bought or homemade, allowing for customization in flavor and sweetness. When selecting granola, opt for low-sugar varieties that contain whole ingredients. If making your own, consider incorporating oats, nuts, and a touch of honey for a nutritious mix.
– Chocolate Chips: For those seeking a touch of indulgence, mini chocolate chips can be included as an optional ingredient. They offer a delightful burst of flavor while reminding us of moderation—after all, a little sweetness can go a long way in making healthy eating enjoyable for children.
Step-by-Step Instructions for Crunchy School Snack Cones
Creating your Crunchy School Snack Cones is a straightforward process that allows for creativity and personalization. Here’s how to make them:
1. Gather Your Ingredients: Start by assembling all your ingredients, including waffle cones, mixed nuts, dried fruits, granola, and any optional ingredients like chocolate chips.
2. Prepare the Nuts: If you prefer toasted nuts, consider lightly roasting them in the oven for a few minutes to enhance their flavor. Allow them to cool before mixing them into the cones.
3. Chop the Dried Fruits: Depending on the size of the dried fruits, you may want to chop them into smaller pieces for better distribution within the cones.
4. Mix It All Together: In a large bowl, combine the mixed nuts, chopped dried fruits, granola, and any optional chocolate chips. Stir gently to ensure everything is evenly distributed.
5. Fill the Waffle Cones: Carefully spoon the mixture into each waffle cone, packing it tightly. The colorful ingredients should create a visually appealing treat that excites children.
6. Serve and Enjoy: Once filled, the Crunchy School Snack Cones are ready to be served. They can be enjoyed immediately or packed in lunchboxes for a nutritious snack on the go.
This fun and nutritious recipe not only provides a variety of flavors and textures but also supports children’s health and well-being. By incorporating these steps and tips, you can create a snack that will be a hit among kids while ensuring they receive the nourishment they need to thrive.
Creating Crunchy School Snack Cones is not just about assembling ingredients; it’s a delightful process that involves careful preparation and a touch of creativity. In this section, we will guide you through the steps of preparing the nut mix, adding flavors, preparing the waffle cones, and filling them to perfection. We will also explore storage options, nutritional information, and creative variations to keep your snacking exciting and healthy.
Preparation of Nut Mix
Ingredients Needed for the Nut Mix
– 1 cup mixed nuts (such as almonds, walnuts, and cashews)
– 1/4 cup seeds (pumpkin seeds and sunflower seeds)
– 1/4 cup dried fruit (raisins, cranberries, or apricots)
– 1 tablespoon honey or maple syrup
– 1 teaspoon cinnamon (optional)
– A pinch of salt
Steps for Preparing the Nut Mix
1. Chop the Nuts: Begin by roughly chopping the mixed nuts into smaller pieces. This not only makes them easier to eat but also ensures they combine well with the other ingredients.
2. Combine Ingredients: In a large mixing bowl, combine the chopped nuts, seeds, and dried fruit. Ensure that the mixture is evenly distributed to achieve a good balance of textures and flavors.
3. Add Sweetness and Spice: Drizzle honey or maple syrup over the mixture. If you choose to use cinnamon, sprinkle it at this stage. The sweetener will help bind the ingredients slightly, while the cinnamon adds a warm, inviting flavor. Mix everything thoroughly, ensuring that each component is coated with the sweetener and the spices.
4. Taste Test: Once mixed, take a small spoonful to taste. Adjust sweetness or spice levels as desired by adding more honey or a dash of salt. This step is crucial for achieving the right balance, so don’t skip it!
Adding Flavor
Achieving the perfect flavor profile is essential for making these snack cones irresistible. Here are some techniques to enhance the taste:
– Experiment with Sweeteners: While honey and maple syrup are excellent choices, feel free to explore agave syrup or coconut sugar for different flavor nuances. Each sweetener brings its unique characteristics, so choose one that complements your nut mix.
– Incorporate Spices: Along with cinnamon, consider adding nutmeg or vanilla extract for an extra layer of flavor. A pinch of cayenne or chili powder can also introduce a delightful kick, creating a sweet and spicy combination.
– Balance is Key: Always aim for a balance between sweet and savory. Ensure the sweetness is not overpowering to maintain the health aspect of the snack.
Preparing Waffle Cones
Creating a sturdy vessel for your delicious filling is essential. Here are some tips for preparing waffle cones:
1. Select Quality Cones: Choose high-quality waffle cones that are sturdy and won’t crumble under the weight of the filling. Look for cones that are thick and have a uniform shape to ensure stability.
2. Stabilize the Cones: To stabilize the cones during filling, you can place them upright in a small cup or muffin tin. This will prevent them from tipping over and making a mess.
3. Optional Coating: For added flavor and crunch, consider dipping the rim of the cones into melted chocolate and then into crushed nuts or sprinkles. Allow them to cool and harden before filling.
Filling the Cones
The way you fill the cones can greatly affect the presentation and taste. Follow these steps for optimal filling:
1. Spoon the Mixture: Using a small spoon or a scoop, carefully spoon the nut mix into each cone. Start by filling the base, then pack the mixture tightly as you fill upwards. This ensures that the cones are filled to the brim while maintaining a neat appearance.
2. Layering: For a more visually appealing cone, consider layering the nut mix with some fresh fruit slices. Place a layer of the nut mix, followed by a thin layer of fruit, and then another layer of the nut mix. This not only enhances the look but also adds a refreshing contrast to the crunchy texture.
3. Leave Some Space: Avoid overfilling the cones to ensure they are easy to eat. Leaving a small gap at the top allows for easier handling and prevents spillage.
Garnishing
Presentation is crucial, especially when it comes to children’s snacks. Here’s how to make your cones visually appealing:
1. Fresh Fruit Slices: Garnish the tops of the cones with fresh fruit slices, such as apple wedges, banana slices, or berries. Not only does this add color, but it also boosts the nutritional value of the snack.
2. Add a Drizzle: For an extra touch of sweetness, consider drizzling a bit of honey or chocolate sauce over the filled cones before serving. This will elevate the presentation and make them even more enticing.
3. Serve Immediately: While these cones can be stored, serving them immediately after preparation ensures that they retain their crunchiness and appealing looks.
Storage and Serving Suggestions
Proper storage is key to maintaining the freshness and crunch of your Crunchy School Snack Cones. Here are some best practices:
Immediate Enjoyment
The ideal way to enjoy your Crunchy School Snack Cones is fresh out of the kitchen. The combination of crunchy nuts, sweet fruit, and the crispness of the waffle cones creates an unbeatable experience. Encourage your kids to enjoy them right away for maximum flavor and texture.
Refrigeration
If you need to store the cones for later:
1. Wrap Them Up: To prevent them from becoming soggy, wrap each cone in plastic wrap or place them in an airtight container. This will help maintain their crunch and prevent moisture from seeping in.
2. Refrigerate: Store the cones in the refrigerator for up to 24 hours. Beyond this time frame, while they may still be safe to eat, the cones can lose their crispness.
3. Reheat Option: If you want to revive any lost crunch, you can briefly place them in a preheated oven at 350°F (175°C) for a few minutes, just until they are warm. This can also enhance the flavors of the nuts.
Nutritional Information
Understanding the nutritional value of your snacks is essential, especially for children. Each serving of Crunchy School Snack Cones offers a balance of healthy fats, protein, and essential nutrients. Here’s a general breakdown:
– Calories: Approximately 250-300 calories per cone, depending on the specific ingredients used.
– Protein: 6-8 grams, primarily from nuts and seeds, contributing to satiety and muscle health.
– Healthy Fats: 15-20 grams, thanks to the nuts and seeds, supporting brain development and overall health.
– Fiber: 4-5 grams, which aids digestion and helps maintain steady energy levels.
– Vitamins and Minerals: Rich in Vitamin E, magnesium, and antioxidants from the nuts and dried fruits, contributing to overall wellness.
This nutritional overview makes Crunchy School Snack Cones a smart choice for a healthy snack option for kids.
Creative Variations of Crunchy School Snack Cones
To keep things fresh and cater to various tastes, consider these creative variations of the Crunchy School Snack Cones:
Nut-Free Versions
For those with nut allergies, you can replace the mixed nuts with toasted oats or puffed rice. These alternatives maintain a satisfying crunch while being safe for a broader audience.
Flavor Variations
– Sweet and Spicy: Add a pinch of cayenne pepper or chili powder to the nut mix for a sweet-and-spicy twist.
– Tropical Flair: Incorporate coconut flakes and dried mango for a tropical-inspired cone. This adds a refreshing flavor perfect for summer snacks.
Seasonal Ingredients
Encourage the use of seasonal fruits and ingredients to keep the recipe interesting. For example, in autumn, try using pumpkin seeds and dried cranberries; in spring, fresh strawberries and mint can add a delightful touch.
Conclusion
Crunchy School Snack Cones are not only easy to prepare but also serve as a nutritious and fun snack option for children. By following the detailed steps for preparation, filling, and garnishing, you can create a visually appealing treat that kids will love. The nutritional benefits of nuts, seeds, and fresh fruits make these cones a fantastic choice for healthy snacking.
Whether enjoyed fresh or stored for later, these cones offer versatility through creative variations and ingredient substitutions. Emphasizing the importance of healthy eating habits, Crunchy School Snack Cones provide a delicious way to fuel your child’s day, enhancing both their learning and overall well-being. So, gather your ingredients and get ready to delight your little ones with this crunchy, colorful snack!


