
Introduction
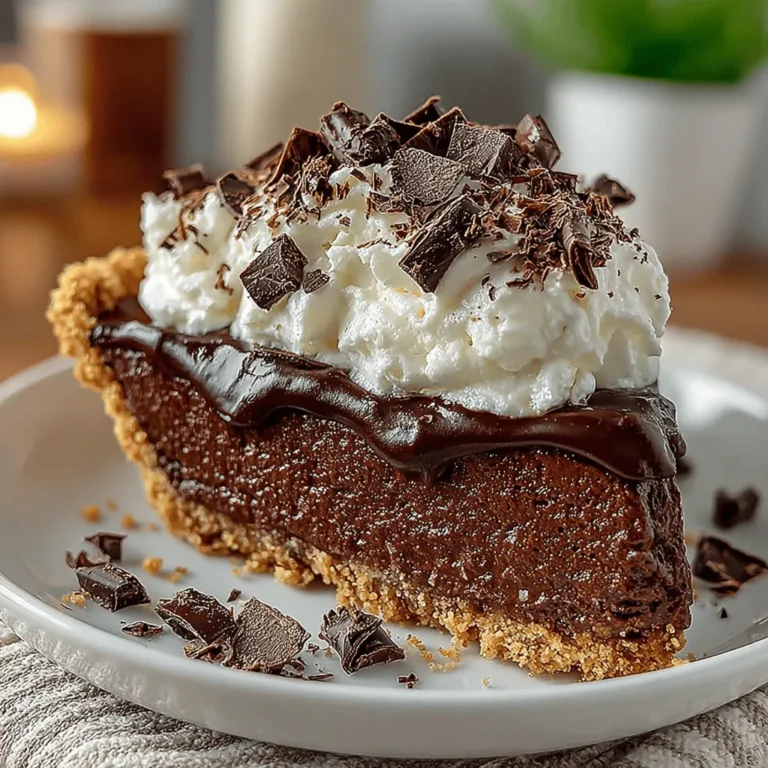
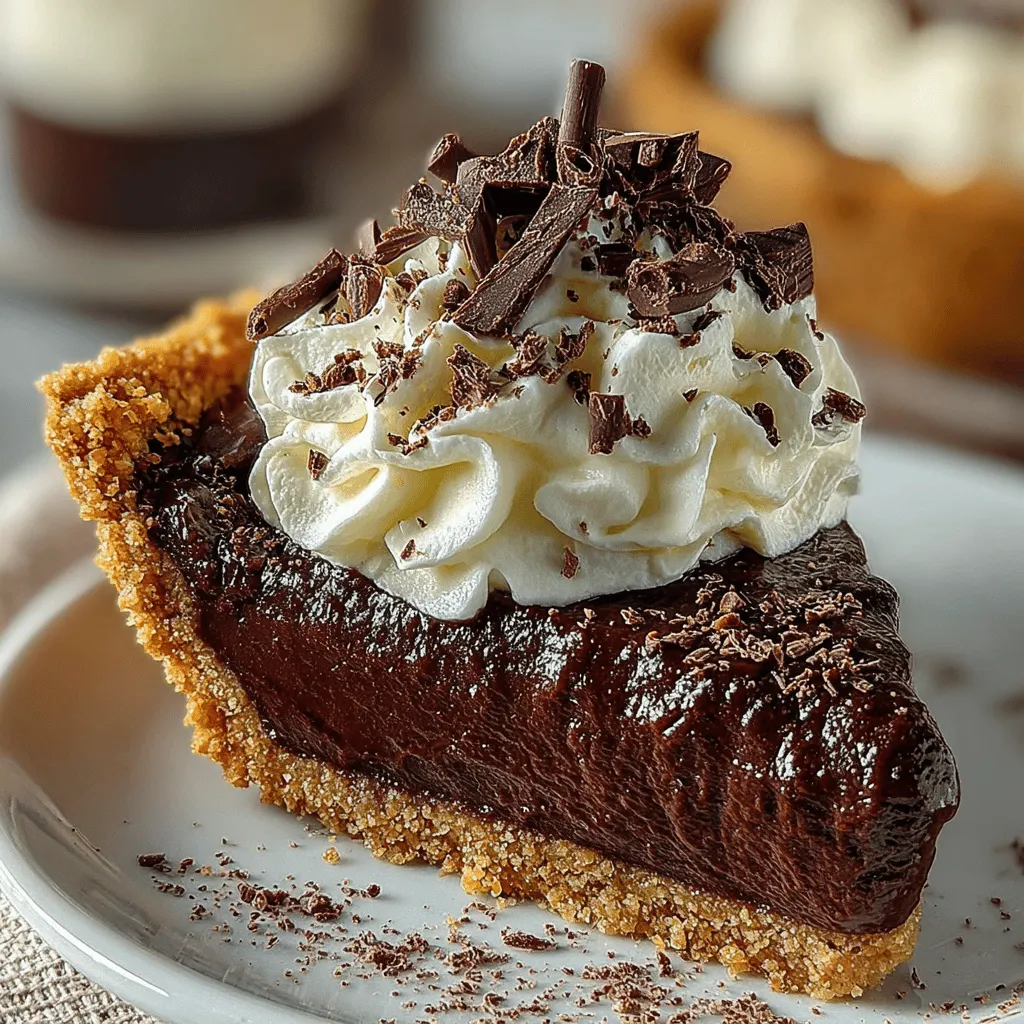
Dive into the rich, indulgent world of desserts with our Decadent Classic Chocolate Cream Pie. This dessert is a delightful union of a luscious chocolate filling nestled in a crisp chocolate graham cracker crust, all crowned with a velvety layer of whipped cream. Whether you’re celebrating a special occasion or simply indulging in a sweet treat, this pie is sure to capture the hearts of chocolate lovers and casual dessert enthusiasts alike. In this article, we will explore the origins of chocolate cream pie, break down the recipe step-by-step, and provide insights into ingredient selection and preparation techniques.
Understanding the Origins of Chocolate Cream Pie
Chocolate cream pie has a storied history that reflects the evolution of chocolate desserts in American cuisine. While the exact origins of cream pie recipes are somewhat murky, it is widely believed that cream pies gained popularity in the United States during the 19th century. The introduction of the chocolate cream pie came as chocolate itself became more accessible to the general public, thanks to innovations in production and processing.
The delightful combination of chocolate and cream has roots in both European and American cooking traditions, with American cooks adapting traditional recipes to create their own unique spins. The rise of chocolate desserts paralleled the increasing availability of cocoa powder and chocolate bars, making it easier for home bakers to experiment with rich flavors and textures. Over the years, variations of chocolate cream pie have emerged, each with its own regional flair and interpretation, showcasing the cultural significance of this beloved dessert.
From humble beginnings, chocolate cream pie has evolved into a quintessential American dessert, often featured at holiday gatherings, family celebrations, and potluck dinners. Its rich filling and creamy topping make it a standout choice, while the versatility of the recipe allows for creativity in presentation and flavor enhancements. Whether served in a traditional pie dish or as individual servings in jars, chocolate cream pie continues to delight palates across generations.
Ingredients Breakdown
Before diving into the step-by-step guide to crafting this decadent dessert, it’s important to understand the key ingredients that contribute to the overall flavor and texture of the pie.
A Closer Look at the Crust
The foundation of any great pie begins with its crust, and for our Decadent Classic Chocolate Cream Pie, we choose a chocolate graham cracker crust.
– Chocolate Graham Cracker Crumbs: These crumbs provide the primary flavor and texture for the crust. The slight sweetness of the graham crackers, combined with the rich cocoa flavor, creates a perfect base that complements the chocolate filling.
– Unsalted Butter: The role of unsalted butter in this crust cannot be overstated. It serves as a binding agent, ensuring that the crumb mixture holds together while also adding a rich, creamy flavor. Using unsalted butter allows for better control over the overall saltiness of the pie, allowing the chocolate to shine.
– Sugar: A touch of sugar enhances the sweetness of the crust, balancing the deeper flavors of the chocolate. It also contributes to the texture, helping to create a slightly crunchy crust that contrasts wonderfully with the smooth filling.
Examining the Chocolate Filling
Next, we turn our attention to the heart of the pie: the chocolate filling.
– Milk and Cream: The combination of whole milk and heavy cream provides a perfect balance of richness and creaminess to the filling. This mixture creates a smooth texture that melts in your mouth, making each bite an indulgent experience.
– Cocoa Powder: The importance of cocoa powder cannot be overlooked. It enhances the depth of flavor in the chocolate filling, ensuring that the pie is robust and satisfying. High-quality cocoa powder will yield the best results, providing a rich, chocolatey taste that is essential for this dessert.
– Cornstarch and Egg Yolks: These ingredients serve as thickening agents, ensuring that the filling sets properly and provides a silky texture. Cornstarch is key to achieving the right consistency, while the fat from the egg yolks contributes to the richness of the pie.
Whipped Topping Essentials
No chocolate cream pie is complete without a luscious whipped topping.
– Heavy Whipping Cream: The importance of using heavy whipping cream cannot be overstated. Its high fat content allows for stable whipped cream that holds its shape and adds a luxurious texture to the pie.
– Powdered Sugar: The subtle sweetness of powdered sugar enhances the flavor of the whipped cream without being overpowering. Its fine texture allows it to blend seamlessly into the cream, ensuring a smooth and creamy topping.
– Garnishes: To elevate the presentation, consider using chocolate shavings or a dusting of cocoa powder as garnishes. These finishing touches not only enhance the visual appeal but also add an extra layer of flavor that complements the rich chocolate filling.
Step-by-Step Guide to Making Decadent Classic Chocolate Cream Pie
Now that we’ve explored the ingredients, it’s time to dive into the preparation process.
Preparing the Crust
The first step in creating your Decadent Classic Chocolate Cream Pie is to prepare the chocolate graham cracker crust.
1. Preheat the Oven: Start by preheating your oven to 350°F (175°C). This is a crucial step, as the right temperature ensures that the crust bakes evenly and achieves the perfect texture. An adequately preheated oven helps to create a crispy crust that will hold up to the creamy filling.
2. Mixing the Crust Ingredients: In a mixing bowl, combine the chocolate graham cracker crumbs, melted unsalted butter, and sugar. Stir until the mixture resembles wet sand. The butter should coat the crumbs evenly, creating a cohesive mixture that will hold together once baked.
3. Pressing the Mixture into the Pie Dish: Transfer the crumb mixture into a 9-inch pie dish. Using the back of a measuring cup or your fingers, firmly press the mixture into the bottom and up the sides of the dish. It’s important to ensure that the crust is evenly distributed and firmly packed to prevent it from crumbling when serving.
4. Baking the Crust: Place the crust in the preheated oven and bake for about 8-10 minutes, or until it is fragrant and slightly firm to the touch. Allow it to cool before adding the filling, as this will help maintain the integrity of the crust.
With the crust prepared, you are now ready to move on to the rich chocolate filling, setting the stage for this delectable dessert to shine. Stay tuned as we continue with the step-by-step process in the following sections.
Mixing Ingredients: Tips for Achieving the Right Consistency
Achieving the perfect consistency in your pie filling is crucial for a successful chocolate cream pie. Start by sifting your dry ingredients, including the cocoa powder and sugar, to eliminate any lumps. This process ensures a smooth and uniform mixture. When measuring the flour for your crust, be sure to use the spoon-and-level method; scoop the flour with a spoon into your measuring cup and level it off with a knife to avoid packing it down, which can lead to a dense crust.
As you mix your ingredients, incorporate the wet components gradually. For example, when adding milk to your dry mix, pour it slowly while stirring continuously. This technique helps to prevent clumps from forming and ensures that the ingredients combine seamlessly. Additionally, using room temperature eggs and butter can make a significant difference in achieving a smooth batter. Cold ingredients tend to clump together, making it more challenging to reach the desired creamy texture.
Baking and Cooling: Ensuring a Sturdy Pie Crust
To create a sturdy pie crust that can hold the rich chocolate filling, blind baking is essential. Preheat your oven to 350°F (175°C). Roll out your dough and place it in your pie dish, ensuring it fits snugly. Prick the bottom of the crust with a fork to prevent bubbling. To blind bake, cover the crust with parchment paper and fill it with pie weights or dried beans. Bake for about 15 minutes, then remove the weights and parchment, and return the crust to the oven for another 5-10 minutes until it’s lightly golden.
Once baked, allow the pie crust to cool completely before adding your chocolate filling. This cooling period is crucial; a warm crust can lead to a runny filling and a soggy bottom. If you’re short on time, place the crust in the refrigerator to speed up the cooling process.
Crafting the Chocolate Filling
Combining Ingredients: Techniques for a Smooth Mixture
For the chocolate filling, start by combining your dry ingredients—sugar, cocoa powder, and cornstarch—in a medium saucepan. Whisk them together thoroughly to ensure an even distribution. Next, gradually add in the milk, stirring continuously to avoid clumps. This method is vital in creating a smooth mixture and helps prevent any lumps from forming during cooking.
Once combined, cook the filling over medium heat, stirring constantly. This step is essential to prevent sticking and burning at the bottom of the pan. As the mixture heats, it will thicken into a custard-like consistency. Be patient and continue to whisk until you achieve a uniform texture.
The Simmering Process: Understanding Temperature Control
Temperature control is critical when creating your chocolate filling. Too high a heat can scorch the chocolate and ruin its flavor, while too low may not allow the filling to thicken properly. Keep an eye on the temperature, allowing it to simmer gently. You should notice small bubbles forming around the edges of the pan, signaling that it’s ready for the next step.
Use a candy or instant-read thermometer to monitor the mixture’s temperature if you’re uncertain—aim for around 180°F (82°C) for the filling to set perfectly. Once you reach this temperature, you can remove it from the heat.
Tempering Egg Yolks: A Crucial Step for a Creamy Filling
Tempering the egg yolks is a crucial step to ensure a creamy and smooth chocolate filling without scrambling the eggs. Begin by whisking the egg yolks in a separate bowl. Then, take a small amount of the hot chocolate mixture and slowly drizzle it into the yolks while whisking continuously. This process raises the temperature of the yolks gradually, preventing them from cooking too quickly.
Once the yolks are warmed through, pour them back into the saucepan with the remaining chocolate mixture. Return the pan to low heat and cook for another minute or two, stirring constantly until the filling is thick and glossy. This technique ensures that your chocolate cream pie has a luxurious texture and rich flavor.
Achieving the Perfect Whipped Topping
Mixing Techniques for Whipped Cream Success
Creating a light and airy whipped topping is essential for balancing the richness of the chocolate filling. Start by chilling your mixing bowl and beaters in the freezer for about 10-15 minutes before whipping the cream. Cold equipment allows the cream to whip faster and achieve increased volume.
When whipping the cream, begin on a low speed to prevent splatters. Gradually increase the speed to medium-high as the cream begins to thicken. This gradual increase helps incorporate air into the cream without overworking it.
Recognizing Peaks: How to Know When Your Cream is Ready
The key to perfect whipped cream is to whip until soft peaks form. Soft peaks occur when you lift the whisk out of the bowl, and the cream forms gentle peaks that flop over at the tips. Be cautious not to overwhip; if you continue beating, the cream can turn grainy, and eventually, you may end up with butter.
Once soft peaks are achieved, you can add powdered sugar and vanilla extract for sweetness and flavor. Continue whipping until just combined, ensuring not to overmix.
Assembling the Pie
Layering the Components for Optimal Flavor
Now comes the exciting part—assembling your chocolate cream pie! Start with your cooled pie crust. Pour the prepared chocolate filling into the crust, using a spatula to smooth it evenly across the surface. Ensure the filling reaches the edges of the crust for a neat and professional look.
Pouring the Chocolate Filling into the Crust: Techniques for an Even Spread
When pouring the chocolate filling, do it slowly and from the center, allowing it to naturally spread out to the edges. This method reduces the risk of air bubbles forming and helps the filling settle evenly. If you notice any bubbles on the surface, gently tap the pie dish on the counter to release them.
Adding the Whipped Topping: Tips for a Smooth Finish
Once your filling is set, it’s time to add the whipped topping. Use a clean spatula to dollop the whipped cream onto the pie, starting from the center and working your way outwards. For a smooth finish, spread the cream evenly with the spatula, ensuring the whipped topping covers the chocolate filling entirely.
For an elegant presentation, you can pipe the whipped cream using a piping bag fitted with a star tip to create decorative swirls on top.
Serving Suggestions and Presentation Ideas
Ideal Serving Temperature and Portion Sizes
For the best flavor, serve your chocolate cream pie chilled. Allow it to set in the refrigerator for at least two hours before serving, as this helps the filling firm up and makes slicing easier. When it comes to portion sizes, aim for generous slices, as the rich flavor of the pie means a little goes a long way.
Creative Garnishing Techniques to Elevate Aesthetics
Garnishing your chocolate cream pie can elevate its presentation. Consider shaving chocolate over the whipped topping or adding a sprinkle of cocoa powder for a rustic touch. Fresh berries, such as raspberries or strawberries, can also add a pop of color and a tart contrast to the sweetness of the pie. Mint leaves are another excellent option for a refreshing garnish that complements the chocolate beautifully.
Pairing Suggestions: Complementary Flavors and Beverages
Pair your chocolate cream pie with a variety of flavors and beverages. A dollop of fresh raspberry sauce or a scoop of vanilla ice cream creates a delightful contrast in flavors. For beverages, consider serving the pie with a rich coffee, a glass of dessert wine, or even a scoop of chocolate stout ice cream for an indulgent experience.
Nutritional Insights
Analyzing the Nutritional Components of the Pie
As delicious as chocolate cream pie is, it’s essential to be aware of its nutritional components. A typical slice contains significant calories, fat, and sugar due to the chocolate and cream used. On average, a slice of chocolate cream pie can have around 400-500 calories, depending on portion size and specific ingredients.
Balancing Indulgence with Moderation
While this pie is a decadent treat, moderation is key. Enjoying a slice as an occasional dessert can fit well within a balanced diet. Pairing it with fresh fruit can help to incorporate additional nutrients and fiber into your meal.
Alternative Ingredient Swaps for Dietary Considerations
If you’re looking to lighten up the recipe or accommodate dietary restrictions, consider these alternatives:
– Use a graham cracker crust instead of traditional pie crust for fewer calories.
– Substitute coconut milk or almond milk for the heavy cream in the filling for a lighter option.
– Use dark chocolate with a higher cocoa content for a richer flavor with less sugar.
Conclusion
The Decadent Classic Chocolate Cream Pie is more than just a dessert; it’s a celebration of chocolate in its most delightful form. By following this comprehensive guide, you can create a show-stopping dessert that brings joy to your table. Whether for a holiday gathering or a casual weeknight treat, this pie is sure to satisfy your sweet cravings and impress your guests with its rich flavors and elegant presentation. Enjoy the process of making this classic dessert and the delightful experience it brings to your dining table.
