
Zesty Lemonade Bliss Popsicles: A Refreshing Treat for Hot Days
As the warm sun bathes us in its golden rays, there’s nothing quite as refreshing as a homemade popsicle. These delightful frozen treats are not only a nostalgic reminder of childhood summers but also a perfect way to beat the heat in a healthier manner. Among the myriad of flavors you can create, Zesty Lemonade Bliss Popsicles stand out for their invigorating combination of tart lemon and creamy coconut milk. This unique fusion promises to tantalize your taste buds while providing a nourishing boost to your body.
The Zesty Lemonade Bliss Popsicles are more than just a treat; they are a celebration of vibrant flavors and wholesome ingredients. The bright acidity of fresh lemon juice pairs beautifully with the rich and creamy texture of coconut milk, creating a popsicle that is both refreshing and satisfying. Whether you’re lounging by the pool, hosting a summer barbecue, or simply looking for a cool snack on a hot day, these popsicles are sure to bring a smile to your face.
The Allure of Homemade Popsicles
In recent years, there has been a noticeable surge in the trend of making popsicles at home. With more people seeking healthier alternatives to store-bought frozen treats, the allure of homemade popsicles lies in the ability to control the ingredients. By crafting your own popsicles, you can ensure that only wholesome, natural components go into your creations, steering clear of artificial flavors, preservatives, and excessive sugars often found in commercial products.
Moreover, making popsicles from scratch allows for endless customization. Whether you prefer your treats to be sweet, tangy, fruity, or creamy, the possibilities are virtually limitless. This creativity not only makes the process enjoyable but also results in visually appealing treats that can impress friends and family. Imagine serving a platter of vibrant Zesty Lemonade Bliss Popsicles, with their cheerful yellow hue, at your next gathering—these popsicles are sure to be a hit!
Ingredients and Their Benefits
The charm of Zesty Lemonade Bliss Popsicles lies not just in their flavor but also in the wholesome ingredients that contribute to their deliciousness. Let’s take a closer look at the key components of this refreshing recipe and the benefits they bring.
Fresh Lemon Juice
At the heart of this popsicle recipe is fresh lemon juice, which provides a bright and zesty flavor profile. Lemons are rich in vitamin C, a powerful antioxidant that supports the immune system and promotes healthy skin. Additionally, the natural acidity of lemon juice can aid digestion and may even help in maintaining a healthy weight. By using fresh lemons, you ensure that the popsicles are bursting with flavor and nutrients, making your treat both delicious and beneficial.
Coconut Milk
The creamy texture of coconut milk adds a luxurious element to these popsicles. As a dairy-free alternative, it is perfect for those who are lactose intolerant or following a vegan lifestyle. Coconut milk is also packed with healthy fats, particularly medium-chain triglycerides (MCTs), which can provide a quick source of energy. These healthy fats help keep you feeling fuller for longer, making the popsicles not just a refreshing treat but a satisfying one as well.
Sweeteners: Honey vs. Maple Syrup
To sweeten your Zesty Lemonade Bliss Popsicles, you have the option of using either honey or maple syrup. Honey, known for its natural sweetness and health benefits, contains antioxidants and has antimicrobial properties. It can add a floral note to your popsicles, enhancing the overall flavor.
On the other hand, maple syrup brings its own unique flavor profile. With a rich, caramel-like taste, it can provide a delightful contrast to the tartness of the lemon. Additionally, maple syrup is a source of essential minerals like manganese and zinc. Both sweeteners are healthier alternatives to refined sugars, allowing you to create a guilt-free frozen treat.
Vanilla Extract
Adding a splash of vanilla extract to your popsicle mixture elevates the flavor, imparting a warm and aromatic essence. Vanilla is known for its comforting qualities and can enhance the overall taste of your popsicles, making them even more enjoyable. Plus, the natural sweetness of vanilla can help balance the tartness of the lemon, creating a harmonious flavor profile.
Lemon Zest
Don’t forget to include lemon zest in your popsicle mixture! The zest captures the essential oils of the lemon, intensifying the citrus flavor. This small addition can make a significant difference in taste, adding a fragrant and flavorful punch that complements the fresh lemon juice beautifully.
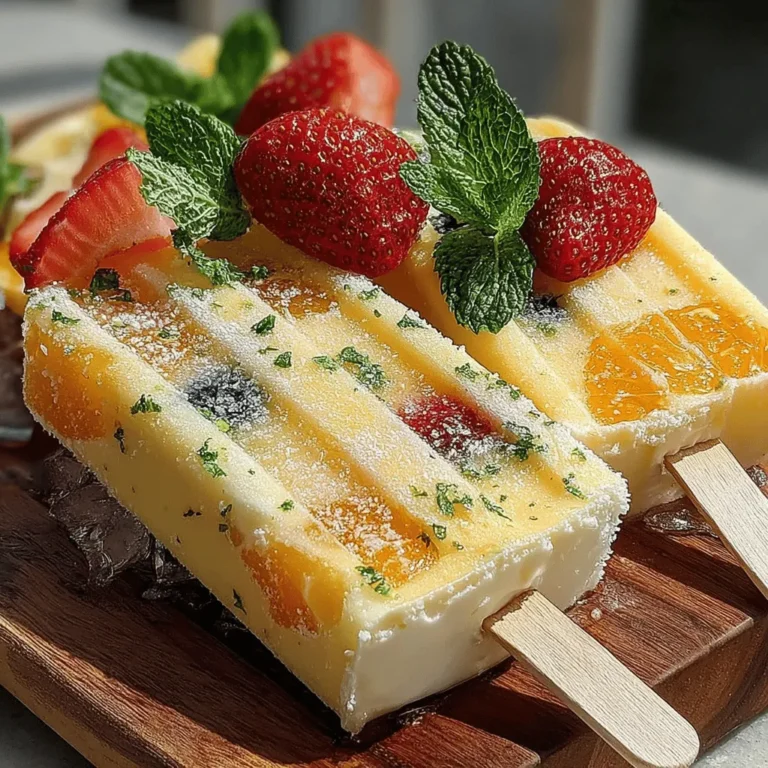
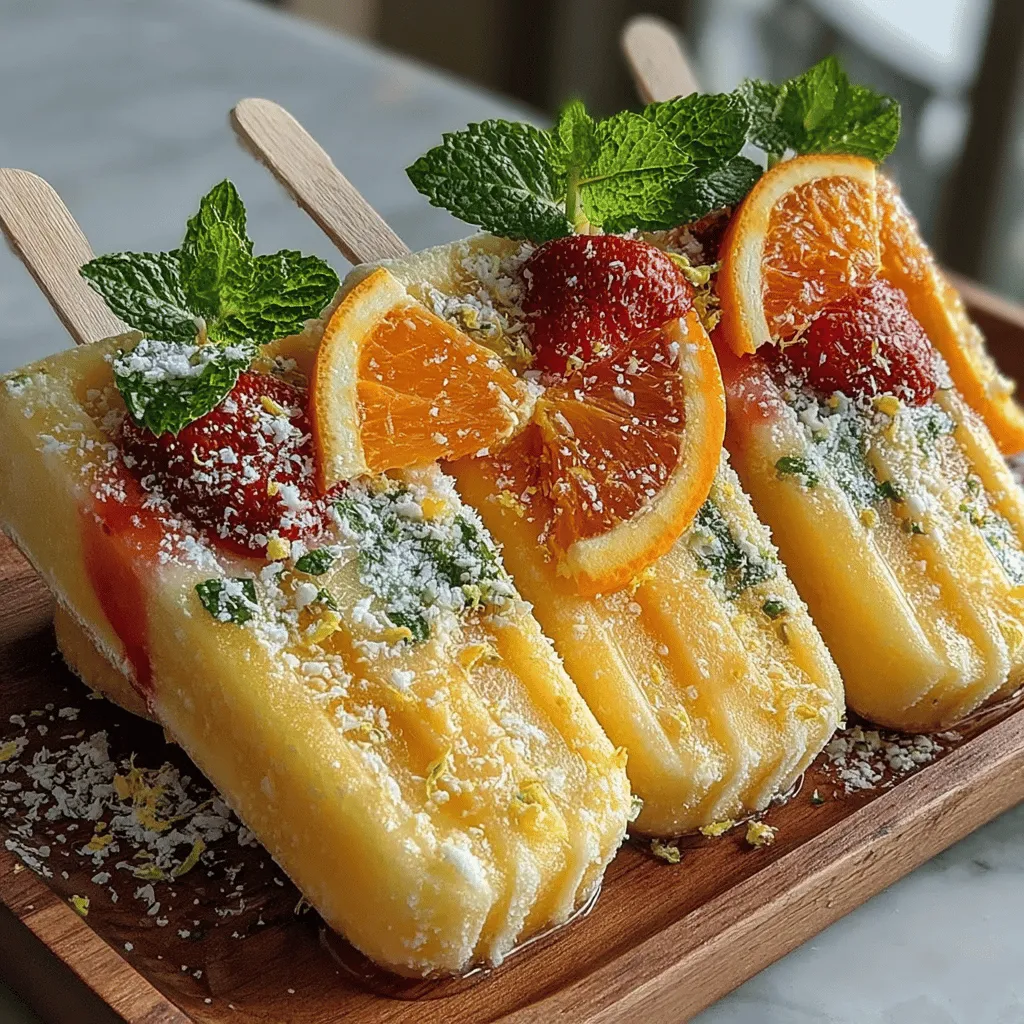
Optional Garnishes: Fresh Mint Leaves or Berries
For an added touch of elegance and flavor, consider garnishing your Zesty Lemonade Bliss Popsicles with fresh mint leaves or berries. Mint not only enhances the visual appeal but also adds a refreshing herbal note that pairs perfectly with the lemon. Berries, such as raspberries or blueberries, can provide a burst of sweetness and a pop of color, making your popsicles even more enticing.
Step-by-Step Instructions to Make Zesty Lemonade Bliss Popsicles
Now that we’ve covered the delightful ingredients and their benefits, let’s dive into the first steps of making your own Zesty Lemonade Bliss Popsicles.
Mixing the Base
1. Juicing the Lemons: Start by juicing about four to six fresh lemons to yield approximately one cup of lemon juice. Ensure you remove any seeds as you go. The fresh juice will be the star of your popsicles, so be generous with the lemons!
2. Combining Ingredients: In a mixing bowl, combine the freshly squeezed lemon juice, one can of coconut milk, your choice of sweetener (honey or maple syrup), a teaspoon of vanilla extract, and the zest of one lemon. Whisk the mixture until all the ingredients are well combined. The creamy coconut milk will blend seamlessly with the tangy lemon juice, creating a luscious base for your popsicles.
3. Taste Testing: At this stage, it’s essential to taste your mixture. Adjust the sweetness according to your preference by adding more honey or maple syrup if desired. Remember, the mixture will taste slightly less sweet once frozen, so aim for a balanced flavor that strikes the right chord between sweet and tangy.
With the base ready, you’re well on your way to creating these delectable Zesty Lemonade Bliss Popsicles. The next steps will involve pouring the mixture into molds and freezing them to perfection. Stay tuned for the continuation of this refreshing recipe, where we’ll guide you through the remaining steps to ensure your popsicles are a hit on those warm summer days!
Creating your own popsicles at home is not just a fun activity; it also allows you to customize flavors and ingredients to suit your taste. In this section, we will dive into the detailed steps for making Zesty Lemonade Bliss Popsicles, ensuring a smooth and flavorful mixture, along with tips on serving and storing. By the end, you’ll be equipped to enjoy these delicious treats anytime!
Combining Ingredients for a Smooth and Flavorful Mixture
To achieve the perfect Zesty Lemonade Bliss Popsicles, start by combining your ingredients in a blender or food processor. Here’s how to do it:
1. Blend Your Base: Begin by adding freshly squeezed lemon juice (about 1 cup), water (2 cups), and your sweetener of choice (1/2 cup). For a balanced flavor, consider using honey, agave syrup, or even a sugar substitute if you prefer a low-calorie option. Blend these ingredients on high speed until the mixture is smooth and well incorporated.
2. Add Flavor Enhancements: For an extra layer of flavor, you might want to include a handful of fresh mint leaves or a few slices of ginger. Blend again until these components are finely chopped and evenly distributed throughout the lemonade mixture.
3. Taste and Adjust: This is the most crucial step. Pour a small amount into a glass and taste it. If you find it too tart, add more sweetener, one tablespoon at a time, blending after each addition until you reach your desired sweetness. Keep in mind that the popsicles will taste less sweet once frozen, so aim for a slightly sweeter flavor than you would prefer in a drink.
Pouring into Molds
Once you have your delicious mixture ready, it’s time to fill your popsicle molds:
1. Choose the Right Molds: Select molds that are easy to use and clean. Silicone molds are particularly good as they allow for easy removal of the popsicles once frozen.
2. Filling Techniques: Carefully pour the mixture into the molds, leaving about 1/4 inch of space at the top to allow for expansion as the liquid freezes. To avoid spills, use a funnel or a measuring cup with a spout. If you accidentally overfill a mold, simply wipe away any excess with a paper towel.
3. Insert Sticks: If your molds come with sticks, insert them into the mixture after filling. For molds without built-in sticks, you can use wooden sticks or even sturdy plastic spoons. Ensure that they are centered and upright to create perfect popsicles.
Adding Garnishes
Garnishes not only add a visual appeal but also enhance the flavor of your popsicles. Here are some creative ways to incorporate them:
1. Fruit Pieces: Before pouring in the lemonade mixture, place small pieces of fruit like lemon slices, strawberries, or blueberries into the molds. This adds a burst of flavor and a fun visual element to your popsicles.
2. Herbs: Add a few whole mint leaves or basil to the mixture before blending for an aromatic twist. Alternatively, you can place them in the molds before pouring the liquid.
3. Zest: For an added zing, consider mixing in some lemon zest into the base mixture. This will amplify the citrus flavor and give your popsicles a beautiful speckled appearance.
Freezing Process
Now that your molds are filled, it’s time for the freezing process:
1. Freezing Time: Place the molds upright in the freezer and let them freeze for at least 4 to 6 hours. For best results, allow them to freeze overnight. The longer they freeze, the easier they will be to remove from the molds.
2. Testing for Doneness: To check if they’re fully set, gently pull on the stick or wiggle the mold. If it feels solid and doesn’t wobble, they are ready!
3. Removing Popsicles: To release the popsicles, run warm water over the outside of the mold for a few seconds. This will help loosen them without melting the popsicle. Gently pull on the stick to remove.
Tips for Perfect Popsicles
Choosing the Right Molds
When selecting popsicle molds, consider the following features:
– Material: Silicone molds are flexible and make it easier to release the popsicles. Plastic molds are more rigid but often come with fun designs.
– Size: Standard molds hold about 3-4 ounces of liquid, which is perfect for single servings. If you prefer larger pops, look for oversized molds.
– Easy Cleaning: Ensure your molds are dishwasher-safe for easy cleanup.
Storage Advice
Once your popsicles are made, proper storage is essential to keep them fresh:
1. Wrap and Store: If you’re not consuming all the popsicles right away, wrap each popsicle in plastic wrap or place them in a freezer-safe bag to prevent freezer burn.
2. Labeling: To keep track of flavors and dates, label your bags or containers. This will help you enjoy your treats at their peak freshness.
3. Freezing Duration: Homemade popsicles can last in the freezer for up to 2 months. After that, they might lose flavor and texture.
Variations and Flavor Combinations
Don’t be afraid to experiment with flavors! Here are some ideas for variations:
– Berry Blast: Substitute half of the water with berry juice or puree for a fruity twist.
– Coconut Lime: Replace water with coconut water and add lime juice for a tropical flavor.
– Herbal Infusion: Experiment with different herbs like lavender or rosemary for unique flavor profiles.
Serving Suggestions
Presenting the Popsicles
When it comes to serving your Zesty Lemonade Bliss Popsicles, presentation is key:
1. Serve on a Platter: Arrange the popsicles on a colorful platter or a rustic wooden board. This makes for an appealing display at gatherings or parties.
2. Pair with Beverages: Serve them alongside refreshing drinks like iced tea, lemonade, or sparkling water for a delightful combination.
3. Garnish: Add extra herbs, fruit slices, or edible flowers for an elegant touch.
Perfect Occasions for Lemonade Bliss Popsicles
These popsicles are perfect for any occasion, such as:
– Summer Gatherings: Serve them at barbecues or picnics for a cool treat that everyone will love.
– Kids’ Parties: Kids will adore these bright and flavorful popsicles, making them a hit at birthday parties.
– Post-Workout Refreshment: After a hot workout, enjoy a Zesty Lemonade Bliss Popsicle as a healthy and hydrating snack.
Conclusion
Making Zesty Lemonade Bliss Popsicles is not just a fun and creative endeavor; it’s also a fantastic way to enjoy refreshing treats that are healthy and delicious. The combination of fresh lemon, sweetener, and creative garnishes makes for a delightful snack that can be tailored to your taste.
As you experiment with flavors and variations, let your creativity shine, and don’t hesitate to try new combinations. These popsicles are not only a treat but also a way to embrace the joys of homemade goodness. So grab your molds, gather your ingredients, and enjoy the refreshing taste and health benefits of these delightful summertime snacks!
